

How To Repair Windows 7 On Asus Laptop
Asus Recovery Disk – Guide for Windows XP, Vista, 7, 8
This is a guide about Asus recovery disks for the following versions of Windows: Windows XP, Windows Vista, Windows 7 or Windows 8.
A recovery disk is as well known as a restore disc, repair disc, boot disc or rescue deejay.
Looking for a recovery disk for Asus? Download Piece of cake Recovery Essentials (our recovery and repair disk for Asus).
![]()
Contents
- 1 Download alternative recovery disk for Asus
- two Recover Asus computers using the recovery disk or recovery partition
- 2.one Recover Windows XP with the deejay or the partition
- 2.2 Recover Windows Vista with the disk or the partition
- 2.3 Recover Windows 7 with the disk or the partitioning
- 2.iv Recover Windows 8 with disk or sectionalisation
- 3 More Information
- 3.1 Support Links
- 3.two Applicable Systems
- 3.iii Applicable Models
Download alternative recovery disk for Asus
If your Asus estimator no longer has the recovery partition needed to restore the reckoner, you can use an alternative recovery disk to access and backup your files.
You tin can download Easy Recovery Essentials, our recovery and repair disk. It's an ISO download image ready to be burned directly to a CD, DVD or a USB wink bulldoze.
Easy Recovery Essentials is compatible with all Asus computers and with the post-obit Windows versions:
- Microsoft Windows 8 (read more than on our Windows viii Recovery Deejay and Repair Disc Download commodity)
- Microsoft Windows 7 (read more on our Windows 7 Recovery Deejay and Repair Disc Download article)
- Microsoft Windows Vista (read more on our Windows Vista Recovery Disk and Repair Disc Download article)
- Microsoft Windows XP (read more on our Windows XP Recovery and Repair Deejay commodity)
- Microsoft Windows Server 2003, 2008 and 2012 (read more on our Windows Server 2008 and 2012 Recovery Discs Download article)

Annotation: Like shooting fish in a barrel Recovery Essentials can not be used to install or reinstall Windows.
Features of Piece of cake Recovery Essentials for your Asus computer include:
- Automatically find and gear up kick errors
- Works even when you lot can't go into Windows
- Recover from virus infections
- Restore your PC to a working country
- Admission and fill-in your important information
- Advanced tools for IT experts
With Easy Recovery Essentials you can:
- Detect and set errors automatically with Automated Repair
- Recover your PC from infections with the built-in antivirus
- Restore your PC to a working land
- Access and backup your most important data (like documents, pictures, music, videos and and so on)
It's compatible with Asus computers (laptops, desktops etc.) and with the following Windows versions: XP, Vista, 7 or eight.
Download Easy Recovery Essentials for Asus computers from here
Windows XP users
Easy Recovery Essentials can be used equally an alternative recovery disk for computers from Asus with Windows XP installed, including the full list of Windows XP editions with Service Packs installed:
- Microsoft Windows XP SP1 (Service Pack i)
- Microsoft Windows XP SP2 (Service Pack 2)
- Microsoft Windows XP SP3 (Service Pack iii)
It'southward compatible with both the Habitation and Professional person editions of Windows XP:
- Microsoft Windows XP Home
- Microsoft Windows XP Professional
Download Easy Recovery Essentials for Asus with Microsoft Windows XP
Windows Vista users
You can use Easy Recovery Essentials as an alternative recovery disk for Asus computers, if you lot have Windows Vista installed.
Piece of cake Recovery Essentials supports x86 and x64 platforms and all Windows Vista editions, including the 32-chip and 64-flake editions:
- Microsoft Windows Vista Ultimate (32-chip and 64-fleck editions)
- Microsoft Windows Vista Enterprise (32-chip and 64-bit editions)
- Microsoft Windows Vista Business (32-bit and 64-bit editions)
- Microsoft Windows Vista Dwelling house Premium (32-chip and 64-bit editions)
- Microsoft Windows Vista Abode Bones (32-scrap and 64-bit editions)
- Microsoft Windows Vista Starter (32-chip edition; Starter edition doesn't accept a 64-bit edition)
It'southward compatible with any of the available Service Packs of Windows Vista:
- Microsoft Windows Vista Service Pack one (SP1)
- Microsoft Windows Vista Service Pack 2 (SP2)
Download Easy Recovery Essentials for Asus with Microsoft Windows Vista
Windows seven users
Easy Recovery Essentials can be an alternative recovery deejay for Asus computers with Windows vii.
Easy Recovery Essentials supports both x86 and x64 platforms and is compatible with the full listing of Windows 7 editions, including the 32-scrap and the 64-flake:
- Microsoft Windows 7 Ultimate (32-bit and 64-bit editions)
- Microsoft Windows 7 Enterprise (32-bit and 64-fleck editions)
- Microsoft Windows 7 Professional (32-bit and 64-fleck editions)
- Microsoft Windows vii Dwelling Premium (32-scrap and 64-bit editions)
- Microsoft Windows 7 Home Basic (32-scrap and 64-bit editions)
- Microsoft Windows 7 Starter (32-bit edition) (Starter is available only in 32-flake)
Information technology's compatible with SP1 of Windows seven:
- Microsoft Windows 7 Service Pack one (SP1)
Download Easy Recovery Essentials for Asus with Microsoft Windows 7
Windows 8 users
Easy Recovery Essentials can be used as an alternative recovery disk for Asus computers with Windows 8 installed.
It supports the x86 and x64 platforms and all the Microsoft Windows 8 editions (8 and 8.1), including the 32-bit and the 64-fleck editions:
- Microsoft Windows 8 (32-bit and 64-bit editions)
- Microsoft Windows 8.1 (32-bit and 64-bit editions)
Download Easy Recovery Essentials for Asus with Microsoft Windows viii
Recover Asus computers using the recovery disk or recovery partition
Asus computers have a recovery division, named "RECOVERY" that you tin can use to restore your Windows. Various models (not all) from Asus have a recovery DVD that can exist used for the same recovery and restore process.
If you do not accept a recovery DVD or a sectionalisation chosen "RECOVERY", go to Download an alternative recovery disk for Asus.
How to access the recovery partition
The recovery partition is available only if your partition is undamaged! If the segmentation is corrupt, use the recovery DVDs instead.
- Restart your computer
- Press F9 repeatedly before the Windows logo appears, correct later on the Asus logo appears
- Select Windows Setup [EMS Enabled]
- Follow the wizard steps
How to access the recovery DVDs
- Restart your figurer
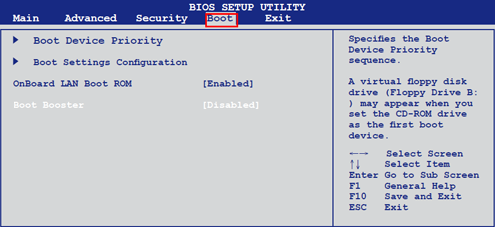
- Boot into BIOS by pressing F2
- Get to the Kicking tab
- Make certain Boot Booster is [Disabled]. Eee PC models have this option.
- Press F10 to salvage the changes and exit BIOS
- Insert the recovery DVD in the disk tray
- Restart your computer
- When the "Please select boot device:" screen appears, select the DVD. It may be marked with "USB:", but information technology's unremarkably the final item from the list
- Press Enter to select the selection
- When the "Printing any key to boot from CD…" screen shows up, press whatsoever keyboard cardinal to continue
- Follow the sorcerer steps
Recover Windows XP with the disk or the partition
Windows XP users can restore their Asus reckoner using the "RECOVERY" partition installed on their hard drive or using the recovery DVD. If you no longer have the "RECOVERY" sectionalization intact, go to Download alternative recovery deejay for Asus.
Instructions when using the recovery sectionalisation:
Personal data will exist lost during the recovery procedure. Backup your computer!
- Restart your computer
- Press F9 before or when the Asus logo appears
- When the Windows Kicking Manager screen appears, select Windows Setup
- When the Recovery System screen shows up, click on Recovery
- Follow the wizard steps
Instructions when using the recovery DVD:
All information volition be lost during the recovery process. Fill-in your computer!
- Restart your estimator
- Press F2 multiple times to boot into BIOS
- Go to the Kick tab
- Cheque if in that location is a "Boot Booster" option. If your estimator has this choice, select it and make sure information technology's [Disabled]
- Press F10 to save the changes, if any
- Insert the recovery DVD
- Restart your calculator
- When the "Please select boot device" screen is being displayed, select your DVD drive from the list. It's usually the last one from the list.
- Press any key when the "Press any key to boot from CD…" screen appears
- The Asus Recovery CD/DVD window will now appear and you have ii options: Recover organisation to a segmentation or Recover system to entire HD.
The Recover system to a segmentation pick allows you lot to keep other partitions and only delete the one y'all choose.
The Recover organization to entire HD choice will delete all partitions from your hard deejay.
- Select your sectionalisation, if you lot opted for Recovery system to a partition
- Click Next
- Follow the instructions to complete the process
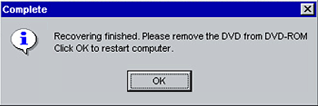
- When the "Recovering finished. Please remove the DVD from DVD-ROM" screen shows up, click OK to restart your computer.
Recover Windows Vista with the disk or the partition
Users of Asus computers with Windows Vista installed can either use the recovery partition or the recovery DVD. If you no longer take the "RECOVERY" sectionalization intact or the DVD, go to Download alternative recovery disk for Asus.
Instructions when using the recovery segmentation:
All data volition be lost during the recovery process. Backup your calculator before y'all continue!
- Restart your calculator
- Press F9 during booting – before or when the Asus logo appears on your monitor
- Press Enter and select Windows Setup [EMS Enabled]
- At the ASUS Preload Wizard screen, click Next
- Select a partition and and then click Next.
Y'all have 3 options at this pace: Recover Windows to first partition simply, Recover Windows to unabridged Hd or Recover Windows to entire HD with two partitions.
The Recover Windows to get-go partition only option will delete only the first segmentation and you lot tin can proceed the other partitions.
The Recover Windows to unabridged Hard disk option will delete all your partitions.
The Recover Windows to entire Hard disk drive with two partitions choice will delete all partitions and create 2 new partitions: C and D.
- Follow the instructions on the adjacent screen to complete the process.
Instructions when using the recovery DVD:
All information will exist lost during the recovery process. Backup your figurer before you continue!
Before you kickoff:
- If your computer uses a secondary hd drive, remove information technology. Windows Vista may setup incorrectly on the wrong disk drive.
The instructions are:
- Insert the recovery DVD in the disk tray
- Restart your computer
- Press Esc during booting and select your optical drive to boot from: CD/DVD
- When CD/DVD option is selected, printing Enter
- Select your option and so click Next.
Similar to the recovery partitioning's instructions above, you lot accept 3 options at this step:
Recover Windows to first partition only: this option will delete only the first partition and you tin can keep the other partitions.
Recover Windows to entire Hard disk drive: this option will delete all your partitions.
Recover Windows to unabridged HD with two partitions: this option volition delete all partitions and create two new partitions: C and D.
- Follow the next steps to consummate the procedure
Recover Windows 7 with the disk or the division
Windows 7 users tin can use the recovery partition or the recovery DVD to recover an Asus estimator. If you no longer accept the "RECOVERY" sectionalization intact or the DVD, get to Download culling recovery disk for Asus.
Instructions when using the recovery partition:
All data will be lost during the recovery process. Backup your calculator earlier you continue!
- Restart your computer and start pressing F9 during booting
- Select Windows Setup [EMS Enabled]
- Select the language
- Click Next
- When the ASUS Preload Wizard screen appears, click Side by side
- Select the partition you want to delete and utilize for the recovery process and click Next.
You have three options at this step:
Recover Windows to beginning partition (this will delete only the first partitioning and y'all can keep the other partitions), Recover Windows to unabridged HD (this volition delete all your partitions from the hard drive) and Recover Windows to entire Hd with ii partitions (this will delete all your hard drive partitions and create 2 new ones: C and D)
- Follow the instructions on the screen to consummate the procedure.
Instructions when using the recovery DVD:
All data will exist lost during the recovery process. Fill-in your computer earlier you continue!
- Insert the Recovery DVD in your computer's optical bulldoze
- Restart your PC
- Press Esc during booting and select the CD/DVD option to kicking from the DVD
- Once the CD/DVD option is selected, press Enter
- Click OK to start the restore process
- Click OK to confirm the process (the procedure will overwrite your hard drive and remove all personal files)
- Follow the instructions to complete the recovery process
If you don't have a Recovery DVD from Asus for Windows Vista, you can create yours if:
- You have the recovery segmentation intact
- You have the AI Recovery Burner icon on your desktop
If you have the AI Recovery Burner on your desktop, follow these instructions to create a Recovery DVD:
- Remove any external difficult drives from your figurer
- Click on AI Recovery Burner
- Insert your DVD (must be blank) and select it from the listing once information technology appears
- Click OK
- Follow the next steps to consummate the process
Recover Windows 8 with deejay or sectionalization
Windows 8 users can use the recovery partition or the recovery DVD to recover an Asus computer. If you no longer have the "RECOVERY" sectionalization intact or the DVD, go to Download alternative recovery disk for Asus.
Instructions when using the recovery partition:
All data will be lost during the recovery process. Backup your estimator before y'all go on!
- Restart your PC
- Press F9 during booting
- When the "Cull an option" screen of Windows 8 appears, become to Troubleshoot
- Click on Advanced Options
- Select Arrangement Prototype Recovery
- Cull an account yous want to utilise
- Type in the account's password
- Click Continue
- Select Use the latest bachelor system image (recommended) option and and so click Next
- Follow the wizard steps to complete the process.
Instructions when using the recovery DVD:
All data will be lost during the recovery procedure. Backup your figurer before you go along!
- Restart your PC and commencement pressing the F9 key during booting
- Wait for the Cull an option screen to prove
- Go to Troubleshoot
- Click on Advanced Options
- Select Organization Image Recovery
- Choose an business relationship you want to use and type in the countersign
- Click Go along
- Select Select a system image, as you have the Recovery DVD. If you lot don't have the DVD, use the other option
- Follow the magician steps to complete the process.
More Data
Support Links
- Easy Recovery Essentials for Windows – our repair and recovery disk.
Information technology'south an like shooting fish in a barrel-to-employ and automated diagnostics disk. It's available for Windows 8, Windows vii and Windows Vista. Information technology'due south also available for Windows XP and Windows Server.
Read more at Windows Recovery Disks.
- The NeoSmart Support Forums, member-to-member technical support and troubleshooting.
- Get a discounted price on replacement setup and installation discs: Windows XP, Windows Vista, Windows 7, Windows viii.
Applicable Systems
This Windows-related knowledgebase article applies to the post-obit operating systems:
- Windows XP (all editions)
- Windows Vista (all editions)
- Windows vii (all editions)
- Windows 8 (all editions)
- Windows viii.one (all editions)
- Windows Server 2003 (all editions)
- Windows Server 2008 (all editions)
- Windows Server 2012 (all editions)
Applicative Models
This Asus-related knowledge base of operations article applies to the following computer models:
- All Asus serial: CG8270, CG8480, G50AB, CG8565, CG8580, G10AC, G70AB, CG8265, CG8890, G30AB, CM6630, CM6431, CM1745, CM1855, M11BB, M70AD, P30AD, CM1831, CM6330, CM6340, M11AA, M51BC, M31AD, CM6870, CM6331, CM1435, M51AC, M11AD, M51AD, CP6130, CM6731, K5130, CP6230, CP3130, K30AD, CM1740, CM1735, UL50At, U35F, U30SD, U46E, U44SG, U47VC, S56CM, U24A, UX42VS, S46CB, UL30Jt, U31JG, U53SD, U36SD, U32U, S56CA, U38N, X201E, U32VJ, S56CB, U45Jc, U41JF, U40SD, U56E, U24E, U82U, U32VM, U38DT, N71Ja, N61Jv, N53Jn, N53Jg, N73Jf, N53JL, N53SN, N75SF, N55SF, N56VM, N76VM, N76VJ, N56VB, N550JV, N46JV, N541LA, N71Jq, N82Jv, N73Jg, N43JQ, N61DA, N73SV, N43SL, N53DA, N53SM, N56VZ, N76VZ, N56VJ, N56DY, N750JV, N56VV, N550JA, N71Jv, N82Jq, N73Jn, N43Jf, N82Jg, N53SV, N43SN, N43SL, N45SL, N46VM, N56DP, N76VB, N46VB, N550LF, N56JR, G60J, G51Jx, G53Jw, G74SX, G55VW, G750JX, G51J, G51Jx, G53SW, G53SX, G75VX, G51J, G60Jx, G73SW, G75VW, G750JW, U53Jc, U43SD, NX90Jq, NX90Jn, K72JU, K43TA, K53SD, K53TK, X54HR, K73TK, K55VM, K75VM, K73BR, X55U, X501A, X75A, X55VD, S46CA, S56CM, K56CA, K95VJ, 1015E, X75VC, X450VC, X550VC, K46CB, X750JB, X550VB, X450VE, X451CA, X550LC, F450CA, X552EA, X552VL, X450LC, X550CL, X450LD, X550LN, X551MA, K72DY, K53U, K52JK, X44L, X54HY, K73SJ, K62F, K52JT, K42JP, A52JU, A42JY, K53SJ, A72JK, K42JK, A42JV, A52JB, K42DE, A52F, K42Jr, A42F, K42JA, K72DR, A42JE, K53TA, X54L, K53BR, K73SD, K55A, K55DR, K75DE, X55A, X301A, X401U, X75VD, X45VD, K46CM, S56CA, K45VS, K73BE, X402CA, X450CA, X550CA, X75VB, X550DP, X450JF, X102BA, K95VB, X550LA, X750LA, X452EA, X552EP, X450LA, X452CP, X450LN, F200MA, K43BY, K53SC, K52JB, X44LY, X44H, X44C, K62Jr, A72DR, K52JU, K52JV, A42JZ, K53E, K42JB, A42JB, A52JC, A42JC, K52F, K72F, A52N, K42JE, A52JE, A42DE, K73TA, K43BR, K42DY, X54C, K55VD, K73SM, K45A, K95VM, X55C, X501U, X401A, X45A, S46CM, K46CA, K56CM, K75VJ, X201E, X502CA, X450CC, X550CC, K56CB, X750JA, X450VB, X200CA, X551CA, X550LB, X750LB, X452EP, X552CL, X450LB, X550VL, X452VP, X550LD, X451MA, X200MA, K43U, K93SV, K53BY, X54H, X44HY, X44HR, K42JY, K42JZ, A52JT, K52DY, K53SV, K73E, K42JC, A42JK, A52JK, K42DR, A52Jr, A72F, A42Jr, A42N, K52DE, A42JA
- Essentio series: CG5290, CG8250, CG1330, CG8350, CM1530, CM1730, CM1630, CM6830, CM6650, CM6850, CP1130, CS6110, CM6730
- Asus Eee PC serial: 1015BX, 1011CX, 1016P, 1015P, 1015PEM, 1015T, 1015PX, 1215N, 1015PE, X101, 1025C, 1225B, 1015CX, 1001PX, 1015PED, 1215T, 1011PX, X101CH, T101MT, X101H, 1025CE, 1215P, 1001PQ, 1015PD, 1001PXD, 1215B, 1015PN, 1015B, 1225C
- Zenbook series: UX21E, UX32VD, UX31LA, UX302LG, UX31E, UX21A, UX32A, UX31A, UX301LA, UX31A, U500VZ, UX302LA
- VivoBook serial: S551LA, S500CA, S550CA, S300CA, S301LA, S200E, S451LB, S301LP, S400CA, S550CM, S550CB, S551LB, F200CA, S451LA, F450CC, F200LA
- Taichi series: 31, 21
Propose an edit
Source: https://neosmart.net/wiki/asus-recovery-disk/
Posted by: alvarezupway1945.blogspot.com
0 Response to "How To Repair Windows 7 On Asus Laptop"
Post a Comment